Affinity Designer 2 Common Custom Settings
I frequently get emails asking how to make changes to the Affinity Designer workspace. The most common changes requested include the color and contrast settings for the user interface, a custom preset for the snapping behavior, a custom preset for the Tools panel and a special stroke default setting in the Stroke panel. Below I explain these changes and how to make them yourself.
Next
Screenshots used by permission of Serif (Europe) Ltd. This article is not endorsed by Serif Ltd.
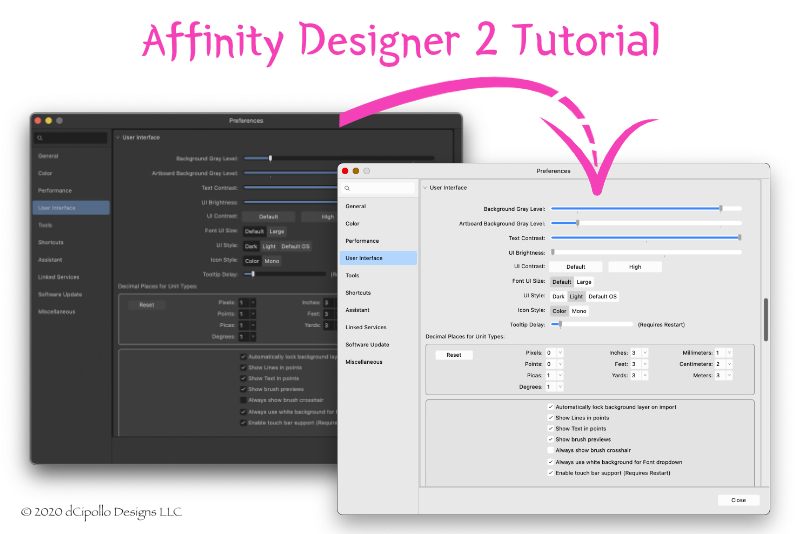
Preferences Panel - User Interface
Many Affinity Designer users want to set the interface to a light gray color and the highest contrast, which makes it much easier to see the smaller details in the user interface. The second requested change is to the decimal measurements to work in whole pixels. The default is a one decimal point measurement, such as 1.1 pixels. However, the iPad and other screens don't display partial pixels very well. So changing the default from one decimal point to zero will let you create projects in whole pixels. These first two changes can be made in the Preferences panel. When you change any settings in the Preferences panel, those changes automatically become the new default settings for any new projects.Panels and Presets
The next few customization requests can be made in the user interface itself. Thankfully, these changes to the default settings can be set as custom presets or global defaults and therefore remain in place until you change them or revert back to the factory settings.Snapping Options
You can customize the snapping feature to your needs to work in whole pixels. This is easy to do by making a small change to the UI Design preset in the Snapping menu and saving it as a custom preset.Scale with Object
The Scale with Object option is turned off by default. However, if you do a lot of scaling of your vector art, usually for different project requirements, the default setting can become a pain. With the Scale with Object option turned on, the stroke applied to an object will grow or shrink in proportion as the object is scaled upward or downward. As you can imagine, turning Scale with Object ON permanently and as a global setting can save you a lot of time and extra work.Tools Panel
The most frequent request is for customizing the Tools panel. Some examples include changing the number of columns in the Tools panel, adding tools, deleting tools or repositioning tools in the panel. As an example, two tools that I use a lot are the Zoom and View tools, which are grouped together in a Flyout menu. Only the View tool icon is visible and the Zoom tool icon is hidden underweight. Also this Flyout is positioned at the very bottom of the Tools panel. I prefer to have both tools listed individually at the top of the panel. We will use this as our example in the next tutorial's step-by-step.Next
Screenshots used by permission of Serif (Europe) Ltd. This article is not endorsed by Serif Ltd.

Related Articles
Editor's Picks Articles
Top Ten Articles
Previous Features
Site Map
Content copyright © 2023 by Diane Cipollo. All rights reserved.
This content was written by Diane Cipollo. If you wish to use this content in any manner, you need written permission. Contact Diane Cipollo for details.